Novorodapie® L
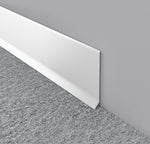
Novorodapie® L Aluminium is a skirting profile with simple design made of anodized or lacquered aluminum. Its design, with flat visible side, ends at the bottom with rounded shape which makes easier the cleaning and covers the perimeter joint, allowing the free movement of the flooring. Available in matt silver, off white and matt black colors.
General Features
Material: Anodized/lacquered aluminum
Length: 7'11''
Dimensions: a: (2-3/8” 3/18” 4”)
Finishes:
Matt silver-13
Off-White - 142
Matt black - 90
Applications
Novorodapie® L Aluminium is a baseboard profile made of anodized or lacquered aluminium. This baseboard has been designed to protect the bottom of the walls, providing a high decorative and also functional value, as it covers the perimeter joint allowing this way the free movement of the flooring. Novorodapie® L Aluminium is easy to install by applying adhesive on the rear.
Materials
Novorodapie® L Aluminium is a profile made by aluminium extrusion. The matt silver and matt black finishes have been anodized, improving mainly through this process its corrosion resistance, mechanical resistance and appearance. The anodized applied has the quality seal Qualanod, which guarantees the quality of the process and the resulting profiles. This seal regulates several tests: appearance and color, thickness measurements, sealing and impregnation control, abrasion resistance, lightfastness, acetic saline chamber and nitric acid immersion. The off-white finish has been lacquered, obtaining so a high quality and homogeneous surface. The lacquering has the quality seal Qualicoat, which guarantees the quality of the process and the final products.
The aluminium is a raw material with excellent chemical and physicomechanical properties. It is light, tough, ductile, malleable and highly durable. It has a great resistance to fire and corrosion.
Installation
Novorodapie® L Aluminium is an easy-to-install profile.
1. Clean the surface to install the Novorodapie® L.
2. Apply mounting adhesive or polyurethane mastic on the rear
3. Join the profile to the wall and press it to get an optimal adhesion.
4. Remove the possible leftover material and let dry.
Couldn't load pickup availability

- Choosing a selection results in a full page refresh.


